We decided on a size - 18 ft. by 15 ft.
The customer also wanted a pergola. They mentioned, also, that the afternoon sun was bright and the direction was from their house. We would try to give them some shade and at least partially block the sun with the pergola.
The first step, as usual, was the excavation. When building a proper paver patio you should always excavate to at least 7 inches below your expected final grade.
My 11 year old twins, Mac and Will get the joy of working with me during the summer. No goofing off for my boys! (Mac is in the blue, Will the red)
When excavating you also need to be planning. The final slope of the patio should be determined. You don't want it perfectly level because of water drainage issues. You don't want it to slope too much or folks won't be able to have a good place to sit. Generally about 1 inch of slope for 10 - 15 linear feet is good enough for good water drainage. It is also a gentle enough slope that if you are sitting or standing on it - it seems level. You also need to pay attention to the best place to send the water runoff. We decided that the front left would be the best spot.
A transit level is a useful tool in planning the elevations. The man pictured above in red is holding the story pole. The man in the blue will use the transit (not pictured) to measure the elevations. We have decided that the back right corner is 0. The front right corner and the back left corner will be 1 inch lower. The front left corner will be 2 inches lower. This will work fine for the patio, but means we are going to have to move some extra soil. The right side turf area will have to be lowered about 6 inches and the left side raised about 6 inches.
Once we have the excavation complete we need to take a break from the patio construction and install the posts for the pergola. We use 6 x 6 pressure treated lumber. With a 8 foot high ceiling we need the posts to rise about 9 1/2 feet above the finished grade. We purchased 6x6x12's and put them almost 2 feet in the ground (don't forget we have already excavated the 7 inches needed for the patio).
Now it's time for the aggregate base. A well built paver patio will have at least a 4 inch base of stone and stone dust. In our area a product called 'crush n run' is just about perfect. For this job we are using 5 tons.
The installation of the 4 inch base is important. If it is not the right slope - neither will the patio be. You can't fix problems with the base by using sand in the later steps. Compacting the base is also key to a well built paver patio. The 4 inches of solidly compacted aggregate is the main cornerstone.
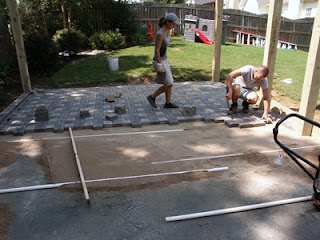
After the base is ready, it's time for sand and pavers. We use a local product called 'river sand'. Other areas in the U.S. have slightly different types sand underlayment materials. We use 1 inch pvc pipe and a 6' level to screed. Care needs to be taken so that the sand is as close to exactly 1 inch thick as possible. The pavers should be layed so that you walk on the ones installed... to get to the place in which you are installing new ones. The pattern we are using here is a popular one. Using either Pavestone or Belgard products - we like the type called 'recs and squares'. There are 6x9's and 6x6's (approx) in this pattern (called the K pattern).
My boys help with the hauling of the pavers from the pallets to the installer.
Many from Spartanburg might be surprised to see my partner, Mike Vandever, actually doing some work. Here he is nailing in 8 inch spikes in order to hold the edging in place. Some sort of permanent edging is vital in keeping the interlocking pavers in place.
I get the fun work now. We spread polymeric sand (a sand with a glue type chemical mixed in) on top of the pavers and sweep the sand in the cracks. We then use the tamper to make all the pavers solid and firm and level.
You then want to slightly dampen the surface to aid in the hardening of the polymeric sand.
With the patio complete now it's time to focus on the pergola. Here we are notching a space for the 2x10 rafters. By creating a 3/4 inch notch, placing the 2x10 in the notch, and then bolting it all together - you get a solid roof foundation that isn't going away.
The 2x10 rafters.
The finished pergola. We used 2x8 pressure treated lumber for the top part. Created curved endings on the 2x8's for a decorative effect. On the very top is 1x2's to hold everything together. The 2x8's run north to south to further block the setting sun. The 2x4's you see in the front are for the purpose of creating a little more shade.
If you want something like this and live in the Charlotte area - try Tex Lawn Company.


how long did it take to do all this?
ReplyDelete6 days
ReplyDeleteIs that the whole family working to build that pergola? WOW! I bet the pergola has created a great family bonding during the construction.
ReplyDeleteThe finished product which come out is always beautiful! It looks like amazing new walkway and adds a charm to outdoor space.
ReplyDeleteExcellent work my friend Driveway paving Harold wood
ReplyDelete